Thursday, November 2, 2023

Ten Years and All is Well. Mostly.

 I've typed, erased and retyped this first line several times and even more in my head before the words even made it through my fingers to the keyboard.  It's true what they say, the first step is always the hardest.

The child who started me on this path for the love of a yellow tomato plant, the fruit of which he would never eat, has gone off to college.  My father, the ultimate Continental and artist has passed and I haven't had a viable garden in at least 7 or 8 years.  The woods to the west thickened up, theneighbor's leelands block the sun from the left, my husband put it an above ground pool and deck which took some square feet and way led on to way to where there was no yield worth mentioning.  We cleared the boxes, installed a shed and that, my friends, was that. It was all over before I ever made the concious decision to stop gardeing.  

And I miss it.

This year I truly tried to reclaim some of the joy I felt in bringing in baskets of fresh vegetables and even missed the hives playing in the beans would cause. I missed my daughter calling the bees olives and her finding the hornworms with her perfect vantage point beneath the leaves. I missed the feeling of pride and purpose gardening gave me.

I tried six grow bags on the pool deck, but those failed miserably.  The sun was only good until the woods filled in and now there hasn't been sun there in months.  I also put two waist height raised beds in the other corner of the pool deck.  Those saw moderate success with some tomatoes and peppers, but nothing compared to what I was used to or expecting.  It's all out there quite a mess now.  I need to clean it up, but doing so reminds me how much I didn't achieve.  

I never forgot about the blog.  Sometimes I'll pull it up to show people the pictures of the train my father drew or show what my garden used to be like to people who feign interest.  I read over a few entries just now and I hardly recognize myself.  The words seem to flow with a certain purpose and tick and now I can't maintain a coherent stream and delete more words than I leave in place. Perhaps that is age.  Perhaps it is just being out of practice.

I've visited the other blogs I used to follow and see that many haven't posted, themselves, in just about as long.  I suppose that's the nature of it.  We find a hobby, barrel into it neck deep, stay for a bit, pack up and move on.  Then I saw some have passed and years ago at that.  May their memories always be a blessing.

Towards the end of this blog's lifespan, I seem to have branched out into other hobbies besides gardening.  I see the keychains and the captured word pieces, both of which I still do.  I don't keep up the blog for the keychains anymore, but there are still people who ask if I can make one here and there and it's always nice. I haven't read in a while, which is interesting.  I could read hours on end and often into the early morning hours without thought.  Now I've joined the ranks of my students.  If I can't digest it in a thirty second blip, then it loses my attention. 

I have taken to knitting. And I am pleased.  It's something I've always wanted to learn.  A colleague and I decided to quit saying we wanted to do something and just do it.  So, we put our purses down, took our press on nails off and started learning.  You can learn anything on YouTube. Now, I'm a knitter.  Not a fabulous one, but I can do it. I've also started fish keeping which I love and now mind several houseplants, but there's that same sun factor when it comes to them thriving.

So, I really don't know what will become of this.  Perhaps I'll keep on. It's more likely that I won't.  If I do, we'll look at this as the new begning.  If not, it's the closure I needed.

There is one thing, however, that ten years cannot erase.

The morning still comes early.  Sweet gardening dreams.

Monday, July 29, 2013

Winding Down and Gearing Up

As summers go, this one was pretty spectacular.  Usually I'm ready to go back to school within just a week or two of vacation, but this year the kids were easy to entertain and the weather was rainy, but fantastic for gardening and for keeping the heat away. 

Usually the summer gets so long and drawn out that I have to look for something to keep me occupied and it usually presents itself as a craft project of sorts.  Keychains for a Cause came out of one summer's boredom and a neighbor's request for one keychain.  It's still going strong and we've raised thousands of dollars for Relay for Life since then.  Granny, I actually think you were the first customer!  I really need to send you some new ones.  So much nicer than what I started with.

Anyway, when I bought my card catalogs mid summer, one of them needed a top, so I cut up a bunch of my favorite classic novels and made this and the necklaces below it.  One of my friends is a very popular independent and self published author.  She saw them and asked that I make some for her to use as giveaways for her newest novel - which BTW, now has over 300 positive reviews on Amazon.  Woohoo!  I started off with the small glass, but then moved to a larger size which I like better.


When I posted them for her, another woman emailed and asked if I'd make her one from the poem she wrote on the passing of her husband, so I did:
 Another woman contacted me and asked me to do one from the cover art of one of her novels.....
And a project was born - The Captured Word.  Anyone write poetry or short stores or the like and would like for me to make you a necklace?  You can email it to me in the font and margins you want and I'll hook you up.  I need more examples for my page so it's an excellent trade off and a great way to celebrate your accomplishments.  If you know anyone who may be interested, send them my way as well.  I've got five that I'd like to make and give away.

The morning comes early - and it really will come tomorrow as we all go back to school for pre planning.  Sweet gardening and necklace making dreams.

Tuesday, July 16, 2013

Sinful Acts in the Guise of Repurposing

Last time I posted about purchasing an awesome card catalog.  I've been wanting one for some time.  It had four distinct sections and I stacked them in two places, two on top of each other.  Problem was, there is only one top, so I had to come up with an idea for the other.  It was a team effort.  The man went out and bought me a sheet of MDF and my neighbor came over with his router to cut the grooves to fit the cabinet.  We paid him in beer and dinner.  It was a good trade.  The next day I went up to school and found a bunch of duplicate copies of novels and plays I had sitting around the classroom and created this decoupage of my favorite passages.
 
It was wet in the picture above.  The bubbles evened out as it dried.  Here is what it looks like on the catalog.
 
 I just love it.  However, I started to feel very guilty about the books that I defaced to make the lid.  I asked forgiveness of each book, but the rest of the pages mocked me in their agony, so I decided to make additional pieces of them pendants for necklaces. 

Ok, sports fans.  It's time to play:  Name That Novel!  No cheating.  


How many did you get?  Thinking I'm going to make some hair lollies and bracelets next.  I can't wait.
 
The morning comes early.  Sweet repurposing dreams.


Saturday, July 13, 2013

Cataloging Wishes

We've been working on our basement for awhile now.  We've finished all of the rooms and now we're working on furnishing it.  Months ago, I bought a huge bar on Craig's List for $150, which is pretty darn amazing for the piece.  Two days ago, we also found a beautiful poker table/table with four nice chairs for the bar room as well.  Couple this with the repurposing I did with the armoire to my sewing hutch - this is a thrift shop/Craig's List basement, and it's looking great!
 
It was missing one thing.  I've searched and searched and drooled buckets over the years, trying to find the one I wanted.  However, they're obsolete and because of this, they've become collectable and people don't get rid of them.  Finishing the basement became the perfect opportunity to finally buy one and after weeks of searching Craig's List, I found one.  Four, exactly.
It's a thing of absolute beauty.  The two lower cases are the exact style.  The top part belonged to the base and top and the second section, although made by the same company as the top, is obviously more recently constructed because it has plastic drawers behind the wood front.
 
Here are the top two sections and lid.  You can see the plastic drawers on one of them.  They had a patent number on them that traces to 1972, so they're newer than that.  These are the two that are meant to go with the base and top which is sad because they have not top and bottom for themselves.
 Here are the bottom two sections. They have wooden, yet unfinished, tops and bottoms. I love the graffiti on them.  Proof that kids will always be kids. They are SOOOO well made.  The drawers glide effortlessly in and out. and the wood is certainly a better quality.
 Compare the drawers of the lighter section (not the plastic one, the all wood one) and the darker cabinets.
 You can tell how much smoother the darker one is. 

The top two sections were made by Gaylord Brothers, Inc.  Not so sure about the bottom section, but we found this card in there, which was quite a hoot.  However, it could very well belong to one of the top two sections and just placed in this one.  The cabinets are roughly the same size with the darker one being just a few fractions of an inch longer.
 So far, I've stacked the two darker and one lighter wooden one with the top in my sewing room.  They're great for holding my thread and beads etc.  Even Duke's getting in on the card catalog action.  They're too tall stacked three high...especially since I bought two more four drawer ones that will get delivered next week.  ;)
 What I really need is a second base.  I can make a second top with some particle board with no problems, but even if I stack two on the ground, they're too low to be useful.  This one with the plastic trays would be wonderful for the boy to store his Legos in.  If I put some foam in the bottom of the drawers in the other lighter section, I could put them side to side and put a large piece of board over them or square them and put a board over them for him to use as his building table.  I could then use the real top on the darker color ones in the sewing room.  I don't think the color change will make it look too bad.
Then again, do I want to give them up to him!?!  Oh, the humanity!

There's so much I want to do with them and so many ways to do them that, I can't decide.  I think I'll just go down there and stare at them for a bit. 

The morning comes early.  Sweet cataloging dreams.

Wednesday, July 10, 2013

Tuesday, July 9, 2013

Are You Kidding Me?

Jeep: 1
Hyundai: 0
AGAIN while at a dead stop. Third time in under a year because of a driver distracted by their cell phone. No damage to me, only her since she bounced off of my rear tire, but this is getting ridiculous.

Monday, July 8, 2013

Transforming a Television Armoire Into a Sewing Cabinet

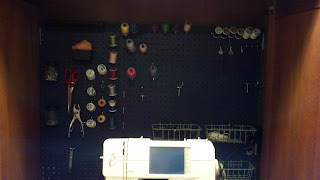
Yesterday I posted that I intended to construct a sewing hutch from this old T.V. cabinet I found at a thrift store.  We did it last night and it turned out pretty darn awesome and I'm very, very pleased with it.  When we decided to finish our basement, there was a dead end hallway that then broke off to a bathroom and a storage room on each of the side walls.  I knew I wanted a sewing cabinet that I could just fold up or close away, but the ones I was finding on-line were in the high hundreds to thousands of dollars.  I did find a few smaller ones, but they were just that.  Smaller.  And stark white.  Nope.  Not happening.  I started looking through thrift stores and Craig's List.  I found several on Craig's list for cheaper than the one I bought at the thrift shop ($150), but they were also dog chewed or not as solidly constructed.  This one is solid. 


I took the measurements and went to the store to buy the supplies.  I bought drawer slides, a peg board and pins, and a piece of particle board for the sliding drawer.  My sewing machine is heavy.  22 lbs without the embroidery attachment.  I knew there was no way to make the drawer slide out completely and not snap the rails, so I got the board cut and bought rails to fit the entire length of the platform.  This way I pull it out just so far and the machine itself is technically still inside the hutch and the weight is not on the drawer itself.  My thought was to then use the drawer pulled all of the way out to use as a large cutting surface, but the particle board is MUCH heavier than expected, however simple plywood wouldn't do.  The man at the hardware store was also nice enough to cut the board to my measurements.
 I painted both the drawer slide and the peg board with the same color as the walls in the room.  It's very dark.  I should have likely done a lighter accent color instead - and used an acrylic instead of the latex, but I didn't want to buy more paint.

My neighbor came by to see how we were doing just as I was trying to fit the peg board in the back of the armoire.  I had it cut so that the bottom would rest on the armoire itself and the backing of the cabinet wouldn't have to support the weight.  However....It SO was not cut to the measurements I gave him.  It was 2 inches too long and about 4-5 inches too short.  Oh well.  I cut it down to fit.  The neighbor did make a good point.  If I put it flush to the back, I couldn't get the pegs to poke through.  We took some extra molding from downstairs and attached it to the backing and ran screws into that to give it some space. 
 I'll go back and hit it with blue paint later.  Note to you: if you have an outlet in the hutch like this one, make sure to run the plug out the back BEFORE you put on the peg board.  We had to drill an ugly hole after the fact.  The, we mounted the drawer slides to the stand.  We then had to pull them off, measure out and drill in the drawer and reassemble it.

 Tada!  Again, the drawer is too heavy to pull all of the way out.  It does come all of the way out, but it worries me that it will snap or bend the arms of the drawer if too much pressure is put on it.  I'm sure we could have found heavy duty drawer slides if I looked on-line a bit harder instead of just going with what the hardware store had.

I found an absolutely horribly awesome rug to go underneath it.
Mounted some stick lights underneath.  I should have moved them farther back.  Because the peg board paint is so dark, it's hard to see back in there.  I may go purchase another set of lights to put farther back.
This is the stand where my sewing machine used to sit -I had already brought it to the basement when I took this.  It's very, very small, but that's not the problem......
THIS was the problem.  This should look like a desk, but instead it's where all of my sewing stuff gets thrown.  This is actually pretty clean because the kids had already brought four baskets of ribbon downstairs by the time I thought to snap this picture.
 And here is what it looks like now.

 
I still don't have everything set up inside the cabinet as it will be, but it's getting there, and I just love how the whole thing closes up nicely.
 Over all, I couldn't be more pleased.  What a great way to create a sewing nook AND make use of dead space.